The KC01 robot is a robot prototype in the "mini" weight class.
Description#
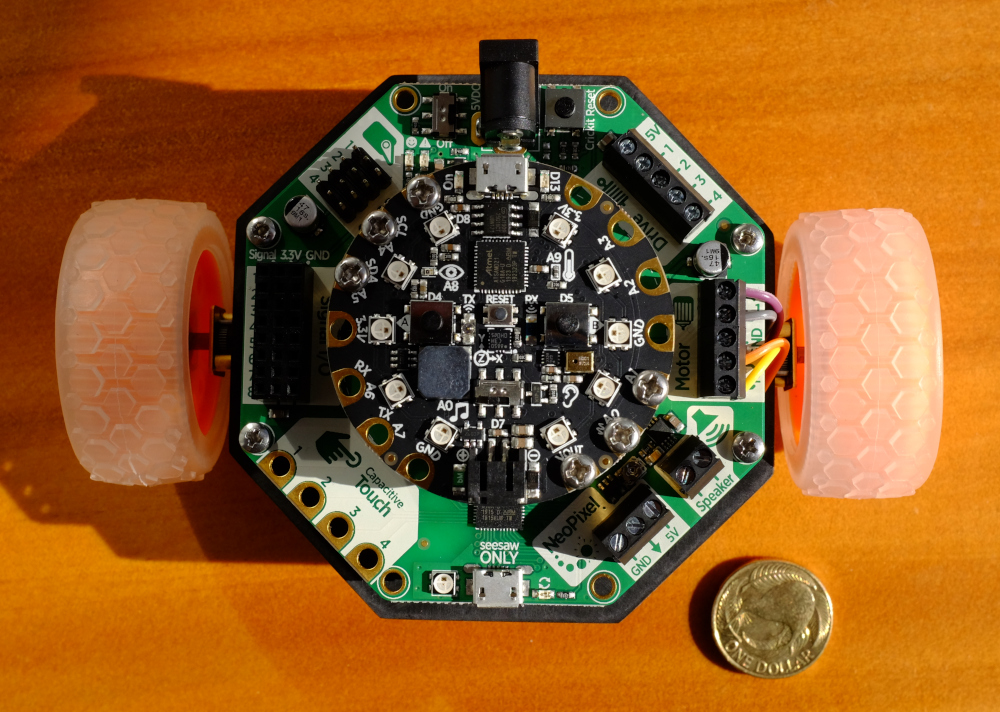 |
KC01 (AKA "Kaycee Oh-One", for the KiwiBot CircuitPlayground Model 1) is a "mini" sized robot that without batteries weighs only 163 grams. It's currently an unfinished design and has two short-range Sharp infrared sensors, but there are plenty of possibilities in this regard. See below.
It uses the Circuit Playground Express microcontroller, which is a good start for people who've never built a robot or used a microcontroller before. The Circuit Playground board has many for non-robot applications as well.
It's highly recommended that you read the AdaFruit Crickit and the Circuit Playground Express guides so you can better understand their features, and how the Circuit Playground Express can be programmed.
I learned recently of an "improved" version of the CRICKIT board (same form factor) called the RoverWing

* relatively easy to build and program
* provide an expandable base for further experimentation
!! Features
[{Image src='attach/KC01/crickit-circuit-playground-thumb.jpg' link='attach/KC01/crickit-circuit-playground.jpg' caption='Crickit for Circuit Playground' align='right' class='imgFloatRight'})
The Circuit Playground Express provides:
- 10 x mini NeoPixels, each one can display any color
- 1 x Motion sensor (LIS3DH triple-axis accelerometer with tap detection, free-fall detection)
- 1 x Temperature sensor (thermistor)
- 1 x Light sensor (phototransistor). Can also act as a color sensor and pulse sensor.
- 1 x Sound sensor (MEMS microphone)
- 1 x Mini speaker with class D amplifier (7.5mm magnetic speaker/buzzer)
- 2 x Push buttons, labeled A and B
- 1 x Slide switch
- Infrared receiver and transmitter - can receive and transmit any remote control codes, as well as send messages between Circuit Playground Expresses. Can also act as a proximity sensor.
- 8 x alligator-clip friendly input/output pins
- Includes I2C, UART, 8 pins that can do analog inputs, multiple PWM output
- 7 pads can act as capacitive touch inputs and the 1 remaining is a true analog output
- Green "ON" LED so you know its powered
- Red "#13" LED for basic blinking
- Reset button
- ATSAMD21 ARM Cortex M0 Processor, running at 3.3V and 48MHz
- 2 MB of SPI Flash storage, used primarily with CircuitPython to store code and libraries
- MicroUSB port for programming and debugging
- USB port can act like serial port, keyboard, mouse, joystick or MIDI!
 |
The Crickit board provides:
- 4x Analog or Digital Servo control, with precision 16-bit timers
- 2x Bi-directional brushed DC motor control, 1 Amp current limited each, with 8-bit PWM speed control (or one stepper)
- 4x High current "Darlington" 500mA drive outputs with kick-back diode protection. For solenoids, relays, large LEDs, or one uni-polar stepper
- 4x Capacitive touch sensors with alligator-pads
- 8x Signal pins, digital in/out or analog inputs
- 1x NeoPixel driver with 5V level shifter
- 1x Class D, 4-8 ohm speaker, 3W-max audio amplifier
Bill of Materials#
Below is the Bill of Materials, with an estimated cost of NZ$156. This doesn't include miscellaneous parts, wire, connectors, etc., or shipping costs and import duties (which can be significant).
| Count | Item | Each | Total Price* | Vendor |
|---|---|---|---|---|
| 1x | Circuit Playground Express | US$25 | NZ$37 | AdaFruit |
| 1x | Crickit for Circuit Playground | US$30 | NZ$45 | AdaFruit |
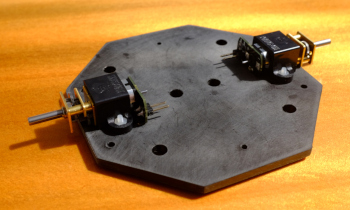
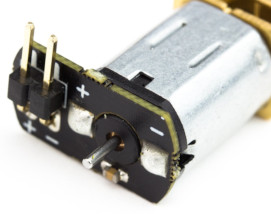
| 2x | Micro Metal Gearmotor with Push Header Shim – 298:1 | £6 | NZ$23.40 | Pimoroni (from Pololu) |
| 1x | Micro Metal Gearmotor Bracket (Pair) (to connect to chassis) | £3.90 | NZ$7.60 | Pimoroni |
| 1x | 90mm x 90mm chassis plate (2-4mm thick wood or plastic: nylon, polycarbonate, Delrin or ) | NA | NZ$5 | Macplas or Cactus Plastics |
| 1x | USB battery | NA | NZ$25 (est) | anywhere |
| 1x | 1/2 inch – Pololu Ball Caster | £2.10 | NZ$4.10 | Pimoroni |
| 1x | Moon Buggy Wheels - Pair | £4.50 | NZ$8.77 | Pimoroni |
| Total | NZ$156 |
Pimoroni has the option of using the UK Post, which is relatively cheap, whereas AdaFruit's shipping is more expensive (even if their prices are in US dollars and tend to be lower).
Options#
- AdaFruit sell some nice 90:1 gearbox motors for US$5.95
- there are many options for wheels (in addition to those on AdaFruit and Pimoroni, check out the ones available from Piborg) - just be sure you get some that match the shafts of whatever motors you choose (the micro gear motors are 3mm)
 |
 |
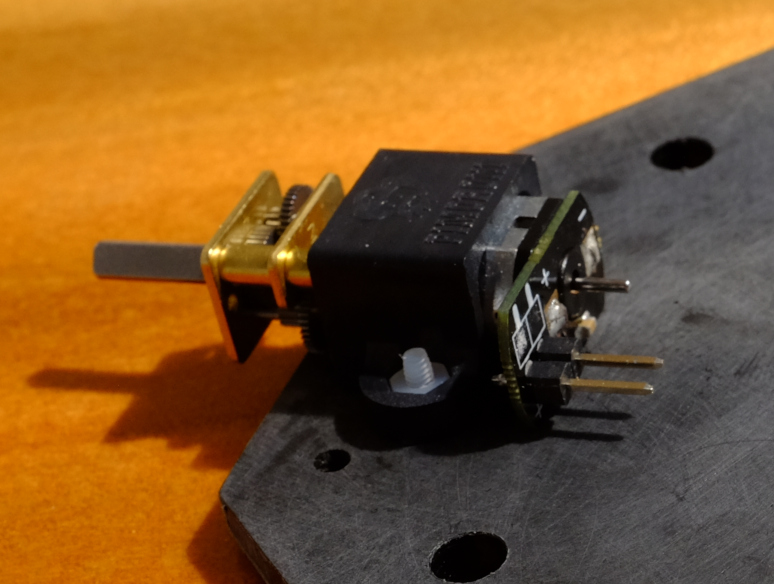
A very low-cost modification is to un-solder the right angle pins of the motor's Push Header Shim and replace them with a two-pin straight header. If you're using (for example) Jumper Jerky or some other type of solderless connectors, the original shim design leaves the plastic connectors hanging down vertically from the motors, significantly reducing the floor clearance (down to about 8mm). If your robot is only operating on a flat wooden, concrete or linoleum floor then this modification is probably not necessary.
Upgrades#
If you want to use odometry, you can upgrade by buying the motor encoders and the motors without the Push Header Shim (which is incompatible with the motor encoders as they both solder to the same place). You'll want the extended back shaft version.
- Magnetic Encoder Pair Kit for Micro Metal Gearmotors, 12 CPR, 2.7-18V (HPCB compatible)
- Micro Metal Gearmotor (Extended back shaft) – 298:1
There are a variety of gear ratios available: 11:1, 20:1, 50:1, 298:1 and 1006:1. This will effect both the upper speed of the motor and its torque (power). I chose the 298:1 because I want my robot to be a bit slower and stronger. The 50:1 might work but if you have to reduce the power sent to the motor in order to get it to drive slow enough, it won't have much torque. The choice of gear ratio is always a compromise.
Other upgrades include adding sensors and IO devices to any of the above-listed connections on the Crickit board.
Programming#
With the two Sharp infrared sensors, I've written a short program that uses two of the touch sensors to activate a main loop function that performs simple object avoidance: if the left sensor detects something the robot backs up and turns turns right; if the right sensor detects something it backs up and turns left; and if both sensors detect something it just backs up further and turns randomly.
Limitations, Issues, Known Questions and/or Other Notes#
- Circuit Playground requires exactly a 5 volt supply (so AA/AAA batteries are not suitable)
- what will we use for the free-wheeling caster? It needs to be between 20-25mm total height
- smooth floors or low carpets only: this robot is pretty small and likely cannot handle transitions between carpet and floor, i.e., requires a smooth operating surface
- The battery is meant to be held between the Crickit and the platform. This means you'll need longer standoffs, long enough to provide clearance ford the battery. I only had some 10mm ones handy, and my USB battery is 21mm thick (and the solder pins protrude about 1mm from the bottom of the Crickit's circuit board) so I couldn't mount my battery. Depending on the size of your battery you'll need probably some 25mm standoffs, or make some out of long 2.5mm bolts and some copper or aluminium tubing (which you can get at a hobby store or Pete's Emporium)
- depending on your battery choice, this robot may have relatively limited battery life (is this really an issue?)
- I recommend putting a bit of light oil on the motor shafts before you push them into the Moon Buggy wheels, as they go on very tight.
- Also, the wheels have a mysterious inner design that's not mentioned on its product page, in that you can push the motor shaft in from either side but the behaviour is different. On one side it's as normal; on the other, if you only push the shaft in half way you'll get a clutch-like action, where the orange inner wheel will chatter and spin if overdriven rather than stall the motor. Feature or bug? I think: feature.
The total cost of all of the major components of this robot (not including shipping) is about NZ$160. This is more than the original $100 goal, but represents a very good value with lots of opportunities for experimentation and exploration in both hardware and software. If there's call for an even cheaper robot I can have a go at another design, using either an Arduino or a Raspberry Pi Zero W (the latter has WiFi so we can ssh into it remotely).