 |
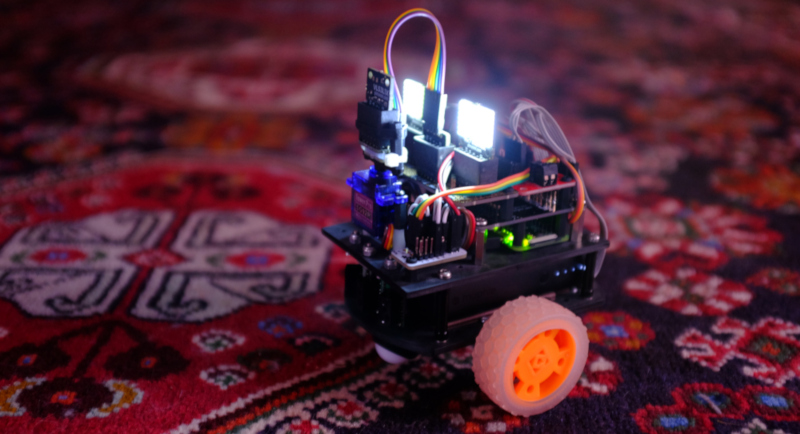
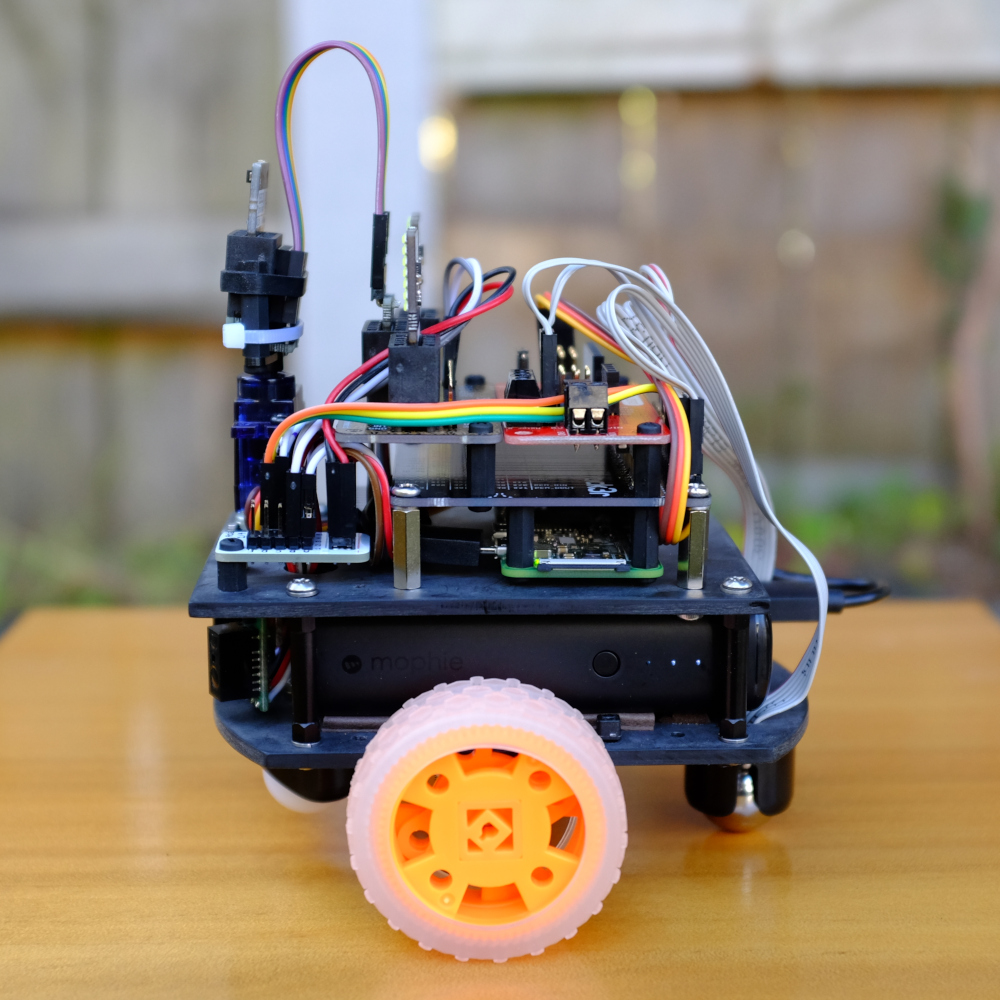
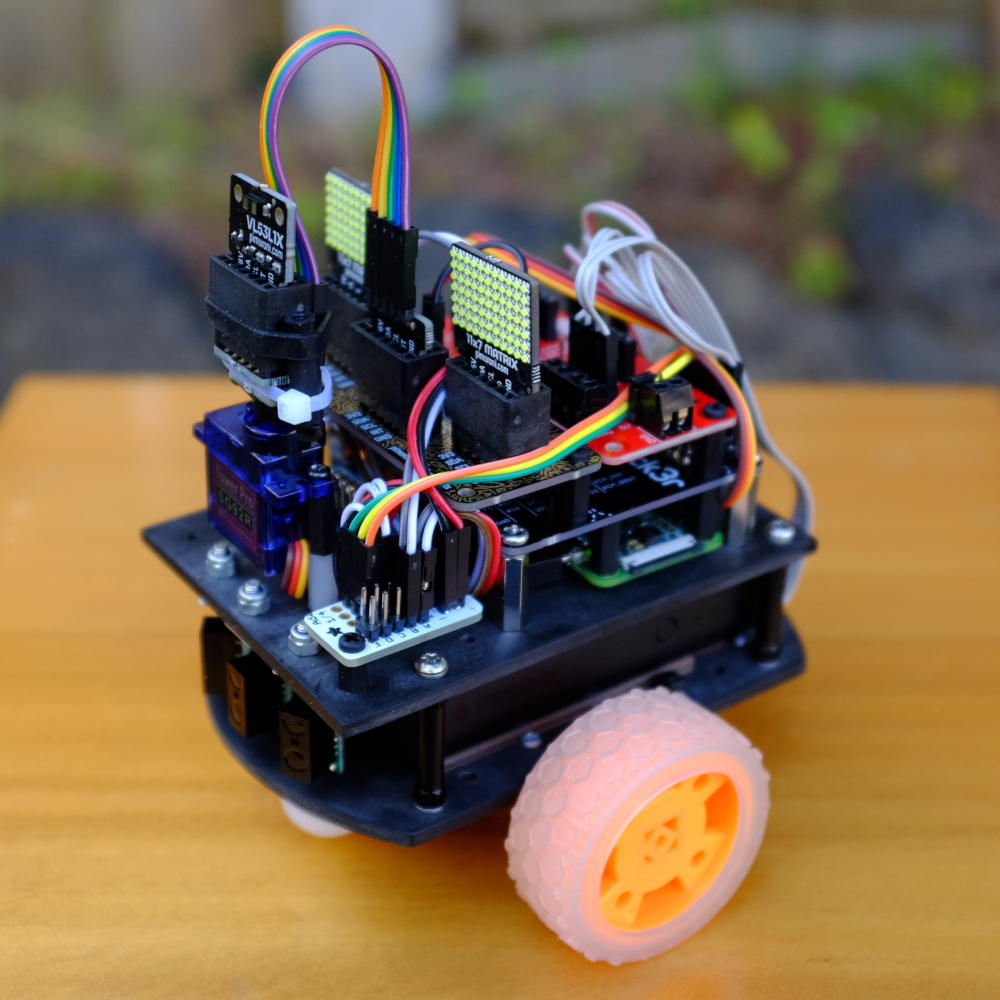
The KRZ01 robot is a robot prototype in the mini weight class.
You can also see the NZPRG blog entry on the KRZ01 and a motor test video on the NZPRG YouTube Channel.
Note that the KRZ01 has been superceded by the KRZ02, a Mechanum-wheeled robot. Its Raspberry Pi Zero W, Mini Black Hat Hack3r, and Picon Zero motor controller were used.
Description#
 |
The KRZ01 (Kiwi Robot for the Raspberry Pi Zero Model 1) uses a Raspberry Pi Zero W (with Wifi) as its computer and a PiconZero as its robot controller. Considering that the microcontroller and robot controller for the larger KC01 together costs about NZ$82, this robot (at about NZ$52) has about a $30 price advantage, and it has wifi.
It has a Raspberry Pi rather than the KC01's Circuit Playground Express — so it runs on Linux, whereas the KC01 runs a single Python program.
RobotShop sell a MiniQ Motor Wheel Set w/ Encoder that includes two motors, wheels and an encoder pair — with the encoders already mounted — for US$36. They use the 50:1 ratio rather than 298:1. The as-built prototype uses the 298:1 motors.
Requirements#
TBD
Photos#
|
| ||
|
|
Features#
The Raspberry Pi Zero W has all the features of the Zero plus Wifi and Bluetooth:
- BCM 2835 SOC @ 1GHz
- 1GHz
- 512MB of RAM
- On-board Wireless LAN - 2.4 GHz 802.11 b/g/n (BCM43438)
- On-board Bluetooth 4.1 + HS Low-energy (BLE) (BCM43438)
- micro-SD
- mini-HDMI
- micro-B USB for data
- micro-B USB for power
- CSI camera connector (needs adaptor cable)
- Unpopulated 40-pin GPIO connector (requires soldering)
- Compatible with existing pHAT/HAT add-ons
- Dimensions: 65mm x 30mm x 5mm
The PiconZero board has the following features:
- I²C interface, leaving all GPIO pins free for your own use*
- 2 full H-Bridge motor drivers with full forward/reverse and speed control. Up to 1.5A continuous per channel (2A peak)
- 6 general purpose output channels (5V) that can be set as: Digital, PWM, Servo, WS2812( aka "Smart RGB" LEDs)
- 4 general purpose inputs (5V) that can be Digital, Analog, DS18B20 (digital temperature sensor)
- All inputs and outputs use 3-pin GVS connectors (Ground, Volts, Signal) - allowing 3-pin sensors, servos, etc. to plug straight in
- Dedicated socket for HC-SR04 ultrasonic sensor. Plug it straight in, or use jumper wires to mount it further away
- 5 GPIO signals, 5V, 3V and Ground brought out to a header
- Power for outputs can be from Raspberry Pi's 5V or from an external USB input line
- Power for motors can be from internal/external 5V, or from a separate power source (3V to 11V)
- Both motor terminals have 2-pin screw connectors AND 2-pin male headers to allow maximum flexibility in connecting
- Python library module making it super-easy to use any of the features
The controller board is supplied fully assembled. No soldering is required.
Bill of Materials#
This is the base price of the robot without the servo or VL53L1X Time of Flight (ToF) Sensor.
| Count | Item | Each | Total Price* | Vendor | |
|---|---|---|---|---|---|
| 1x | Raspberry Pi Zero W w/headers | US$14 | NZ$21 | AdaFruit | |
| 1x | Picon Zero | £15.90 | NZ$31 | Pimoroni | |
| 2x | Micro Gear Motor (Extended back shaft) - 298:1 | £5.10 | NZ$20 | Pimoroni | |
| 1x | Magnetic Encoder Pair Kit | £9 | NZ$18 | Pimoroni | |
| 1x | Micro Metal Gearmotor Bracket (Pair) | £3.90 | NZ$16 | Pimoroni | |
| 1x | Moon Buggy Wheels - Pair | £4.50 | NZ$9 | Pimoroni | |
| 1x | Mini Black HAT Hack3r – PCB only | £4.50 | NZ$9 | Pimoroni | |
| 2x | Male 40-pin 2x20 HAT Header | £1 | NZ$2 | Pimoroni | |
| 1x | 2x20 pin Female GPIO Header for Raspberry Pi - 11mm | £2.10 | NZ$8.50 | Pimoroni | |
| 1x | Breakout Garden Mini (I2C) | £9.60 | NZ$19 | Pimoroni | |
| 3x | Sharp GP2Y0D810Z0F Digital Distance Sensor 2-10cm | US$7.95 | NZ$37 | Adafruit | |
| 1x | 3mm Delrin chassis, nuts and bolts | - | NZ$20 | Adafruit | |
| Base Total | NZ$210.50 | ||||
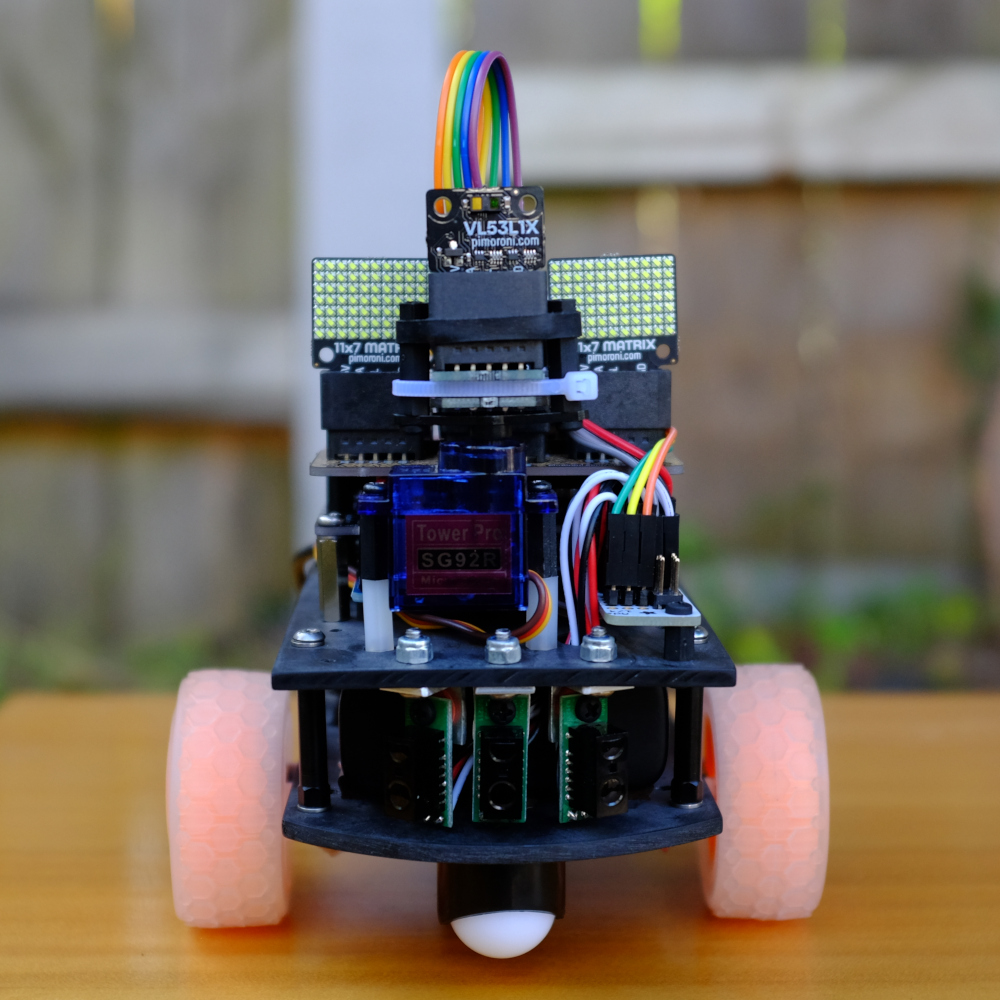
| 1x | VL53L1X Time of Flight (ToF) Sensor | £14.40 | NZ$29 | Pimoroni | |
| 1x | Micro servo | US$5.95 | NZ$9 | Adafruit | |
| Extras Total | NZ$248.50 |
Build#
 |
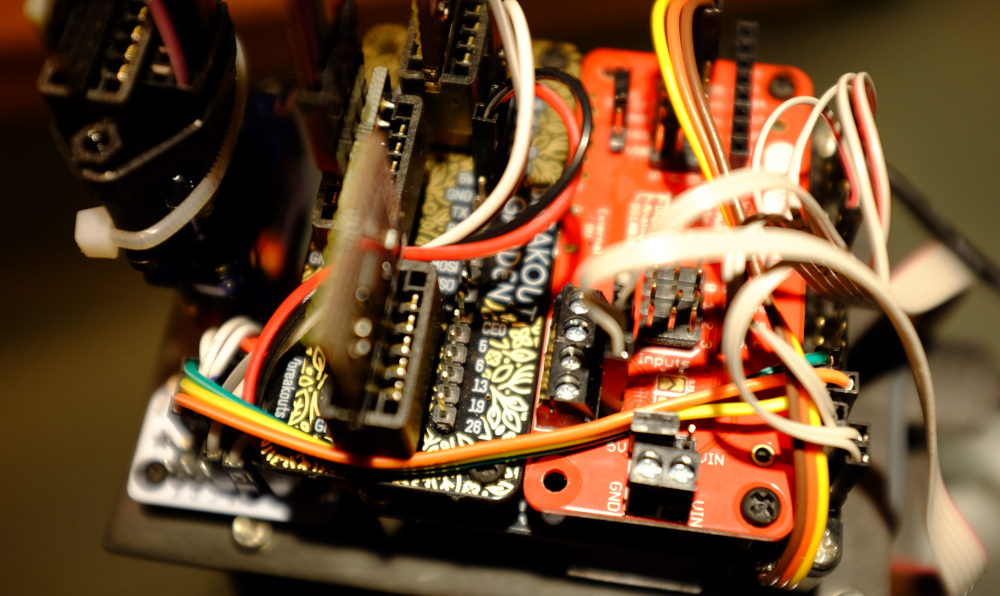
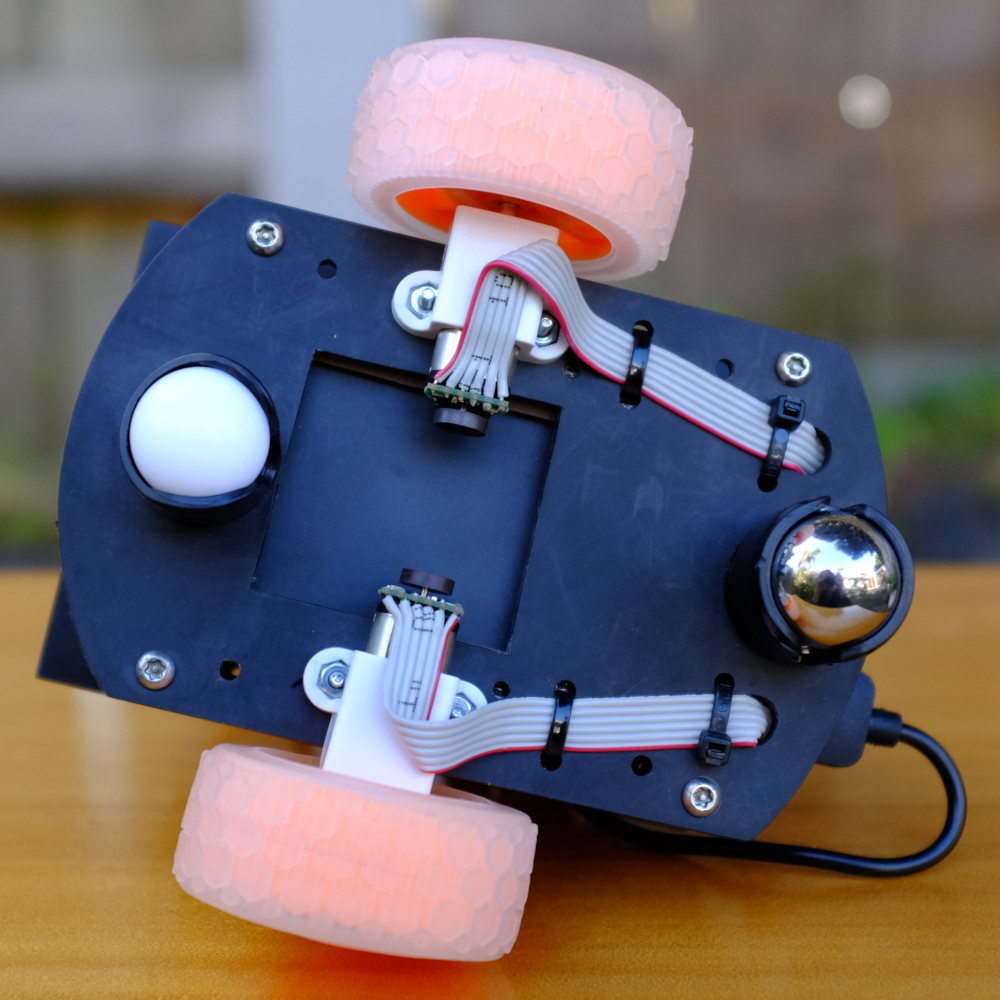
The chassis is made out of 3mm Delrin plastic, sourced from MacPlas in Auckland. The various components were laid out on paper taped to the plastic, which was then cut (using a sabre saw with an "extra clean" wood blade) and the holes drilled. Stainless, black nylon, and aluminium spacers were used for connecting the boards and mounting the circuit boards.
The trickiest part (by far) was soldering the ribbon cable to the tiny motor encoder board and then soldering that to the back of each motor, which themselves are extremely small, just 25mm long. It was pretty fiddly work, and getting the alignment of the board correct took a great deal of care and patience. A magnifier might come in handy. See the bottom view above.
If you don't plan to use the motor encoders, the motors are also available with an solderless connector, the Micro Metal Gearmotor with Push Header Shim – 298:1. Using the motor encoders entails writing software to pay attention to the motor's rotation; this is called a PID Controller.
Connections were made either with ribbon cable (soldered where necessary) or using header pins and "jumper jerky" solderless connections.
Options#
If you only want motor control, there's a cut-rate version of the Picon Zero people
called the PicoCon which sells for £5. Strictly speaking, the servo and ToF distance sensor are not required, so that could be skipped. The three infrared sensors (which come in 5cm, 10cm and 15cm ranges) could be replaced with piano wire bumpers using lever switches that would cost several dollars.
Upgrades#
As this uses a Breakout Garden it's easy to change the sensors to different I²C Breakout Garden boards. If the Mini Black HAT Hack3r (holding the Pi, motor controller and Breakout Garden Mini) were moved a bit aft, there might be enough at the front to mount a Pixy2 camera. It's yet not clear that a Raspberry Pi Zero has enough processing power to work effectively with a Pixy2, so this will likely be implemented on the KR01 instead. Otherwise there's room up front for a common Pi camera if the servo is left off (or mount the camera on the servo!)
Notes, Known Questions and/or Issues#
This robot uses 47mm "Moon Buggy" wheels and ball casters. The fore caster is mounted a bit higher than the aft caster, so (hopefully) it won't snag on things. Absent a bumper this is a possibility. The robot is fine on wood floors and low-pile carpets, and can navigate between them without incident. There's a Kilim rug in the lounge (owned by the cat) that has a 15mm edge which has proved impossible for the robot to surmount. It just pushes up against that edge and spins its wheels.
This points out the fact that robot currently has no bumpers. I'm considering making a tiny version of the KR01's polycarbonate bumpers, or perhaps a pair of piano wire feelers. The robot is currently relying entirely on its infrared sensors. We'll see how this works out, but given it can hang up on the cat carpet perhaps a bumper is in order.
This was not a solderless project. As noted in the Build section, soldering ribbon cable to the motor encoder boards and then soldering them to the motors was quite tricky, not for the faint of heart. You can avoid this by avoiding the encoders and using the solderless version of the motors.
1 May 2020 Update: the front ball caster seemed to get hung up sometimes when trying to transition from floor to carpet. David Anderson had cautioned against using a front caster in his YouTube video, so this was hardly an unknown. Due to this issue the front caster has been removed, and the symmetry of the robot sacrificed a bit by moving the wheels forward about 1cm in order to set the balance aft. Even with this change of balance it's still possible for the robot to fall forward onto its nose. Some kind of curved skid to keep this from happening could be fitted, but currently the plan is to change this from a 2 wheeled to 4 Mecanum wheel robot, so no further changes to this design are expected.