KR01 Robot#
 |
The KR01 Robot is a small robot inspired by David P. Anderson's SR04 robot. There's a series of articles describing the KR01 robot on the NZPRG blog, see The KR01 Robot Project .
.
The cost of this robot is likely too high to be considered as a prototype for the NZPRG (though it'd be possible to reduce costs, see below), so I'm also designing several other lower-cost robot prototypes.
(you can click to enlarge images on this page)
Requirements#
 |
The following requirements are modeled upon David Anderson's SR04 robot:
- to be able to navigate and survive in a normal (cluttered) household environment, without getting stuck
- to provide a robust and reliable platform for developing navigation and behavior software
- be entertaining, aesthetically-pleasing, and inspiring for the local human population
- to investigate, test and use the latest in sensor technology in order to develop more complex behaviours
A fourth item has been added to David's list, as it's been almost twenty years since his SR04 was built and the hobbiest market for sensors has exploded, from postage stamp sized LiDAR distance sensors (that return values in millimeters) to AI-backed camera-as-sensor products (that can recognise objects, colors, QR codes, etc.), all well under $100. This was not possible even five years ago.
Additionally, it is meant to explore Murray's Thesis, which requires the development of a multi-threaded Python robot controller that includes a PID Controller, ultrasonic , LiDAR, IR and bumper sensor behaviours. Can it somehow learn?
Specifications#
 |
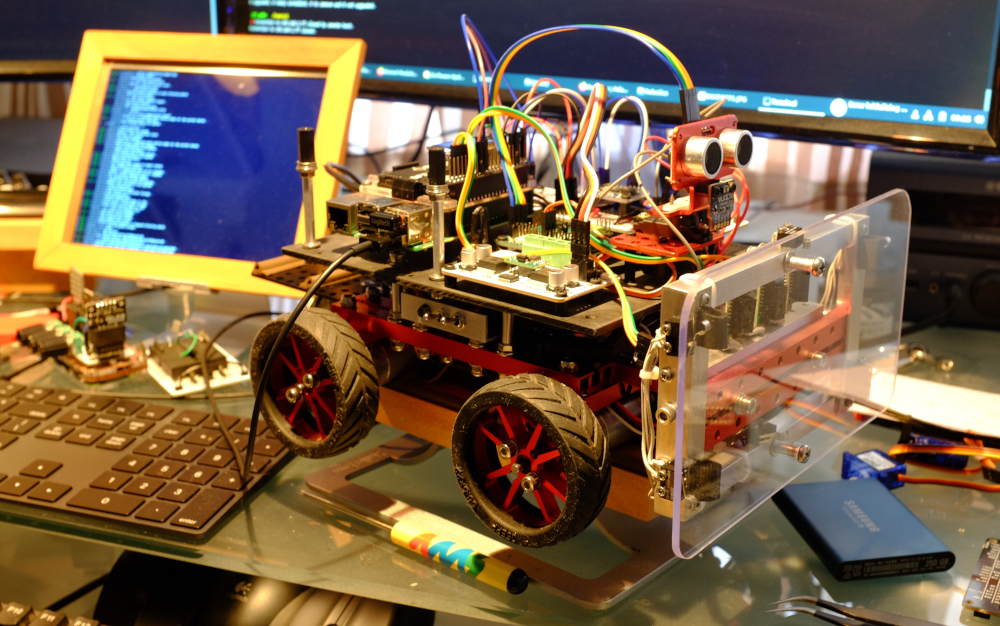
- Raspberry Pi 3 B+
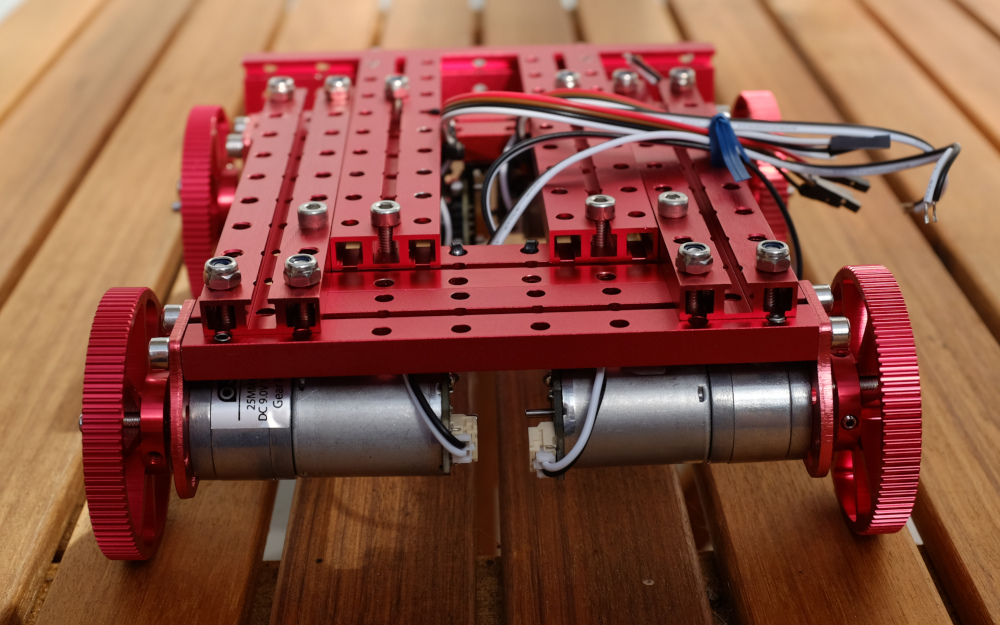
- modified OSEPP Tank Kit chassis with either silicon tank treads or four silicon tires
- four OSEPP 9.0 volt 185 RPM motors with 1:45 gear ratio and hall effect motor encoders
- uses a PiBorg Thunderborg Dual 5A Motor Controller with DC/DC & RGB LED for its motor controller
- three front infrared sensors
- front bumper with polycarbonate plastic bumper with three-way subminiature lever switches
- infrared motion detector
- microwave motion detector (goes through walls)
- time of flight laser distance sensor (up to 4m with 25mm accuracy)
- ICM20948 9DoF Motion Sensor, including 3 axis accelerometer, 3-axis gyroscope, 3-axis compass
- Pixy2 Object Recognition Camera (camera-as-sensor)
Sensors#
Basic Obstacle Avoidance Sensors #
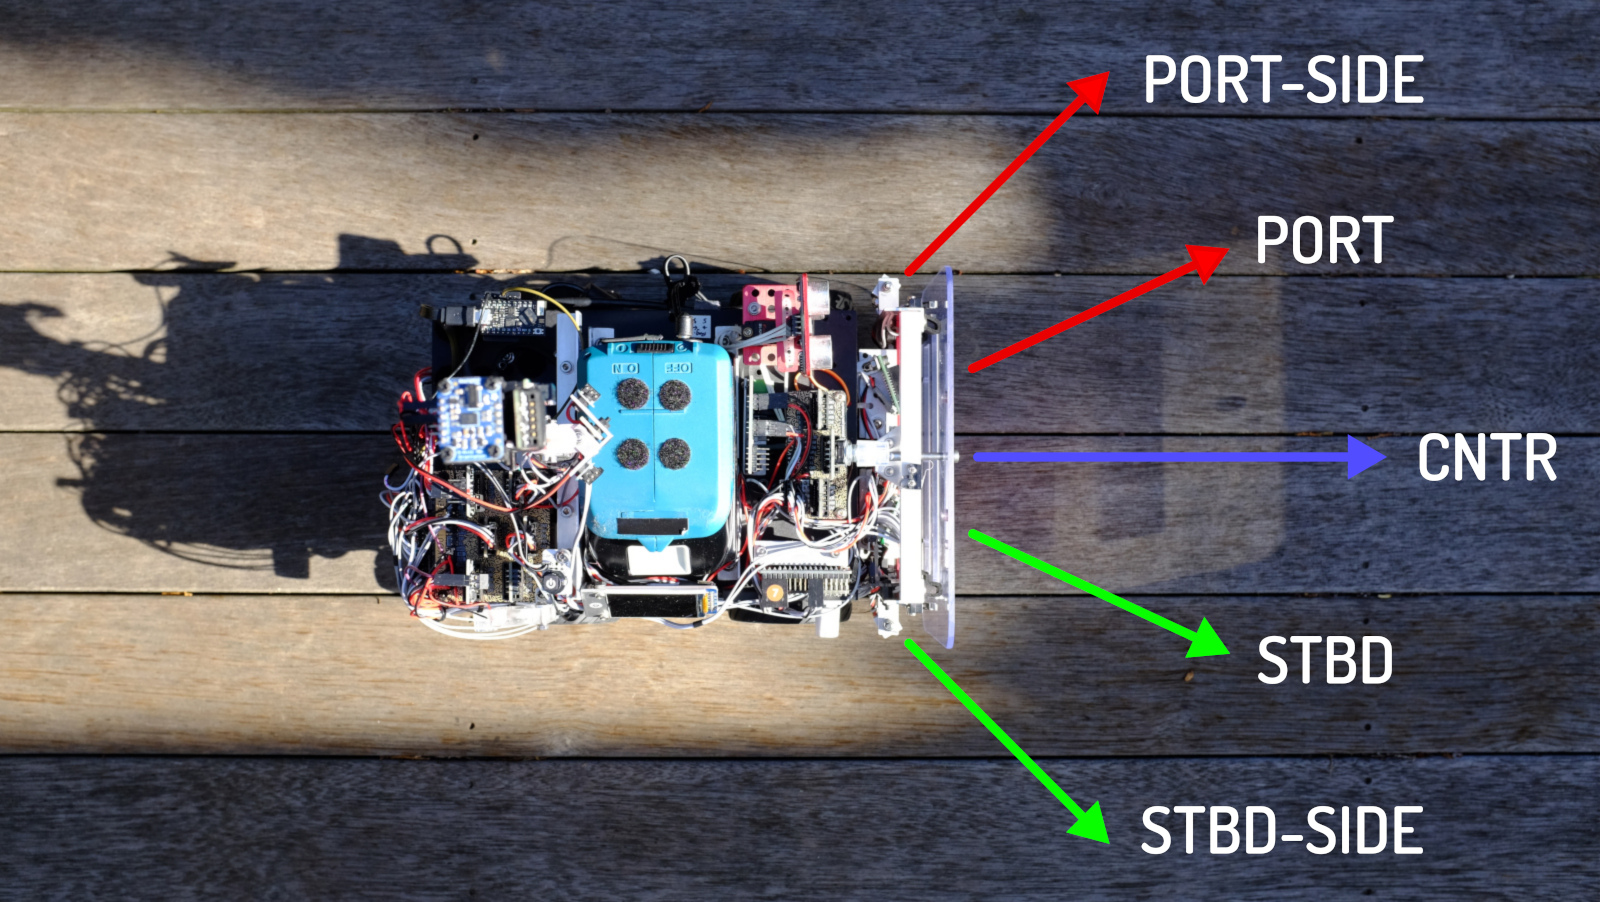 |
The KR01 robot has port, center and starboard bumpers. (bumpers will be defined in a different and as-yet unspecified Behaviour).
It also has port-side, port (oblique), center, starboard (oblique), and starboard-side analog infrared sensors (Sharp GP2Y0A60SZLF 10-150cm), each with a range of about 1.5 meters. The side sensors face forward at 45° (rather than 90°, as per recommendations from the DPRG), the oblique sensors are 25° off center.
Behaviour Plan#
- The Roam Behaviour uses the center IR and will slow the robot down beginning from 100% target velocity at 50cm to a full stop at 25cm. This adds a lambda function to both motor controllers to limit the top speed as a function of distance. Currently there is no recovery from the full stop, i.e., once stopped some other undefined behaviour will need to be triggered to back up or otherwise avoid the obstacle).
- The Avoid (maybe "Swerve") Behaviour will add a lambda function to both motors that will progressively alter the steering (difference between the motors) as a function of distance based on the distance and difference of the port and starboard oblique sensors.
- The side infrareds have two modes: Wall Follow or Avoid Side. In Wall Follow mode it will attempt to keep the robot at a fixed distance from a perceived wall on either side. In Avoid Side mode it will act similarly to the oblique sensors and attempt to push the robot away from the wall (likely at a greater distance than when in Line Follow mode), with the amount of push inversely proportional to distance.
Current Weight#
- chassis (including motor controller, SSD, motors, and bumper assembly): 1.4kg
- main board (including Raspberry Pi and all upper sensors): 400g
- battery:
- Makita 18V 3.0Ah: 730g
- Makita 18V 1.5Ah: 475g
- Makita 12V 1.5Ah: 210g
- Makita ADP05 clip: 125g (for use with 18V batteries)
Typical weight with 18V 3Ah battery: 2.6kg
Chassis#
 |
The chassis uses the OSEPP Tank Kit as its basis, using an additional pack of beams and an additional pair of motors. The weight of the robot precludes using the tank treads so it uses four of the black silicon tires instead.
The chassis currently uses a Pimoroni HT0740 40V / 10A Switch Breakout to control power to the sensors, so that the robot can go into a "low power" mode. There is a manual bypass switch in order to use the sensors without the 10A switch control.
The bumper assembly mounts to the front of the chassis, and includes six subminiature lever switches (wired as three), to detect port, center and starboard bumps. It also has three 15cm infrared sensors that look through the polycarbonate plastic of the bumper. The center sensor is slightly offset (as it tends to see itself in the mirror and just stays on).
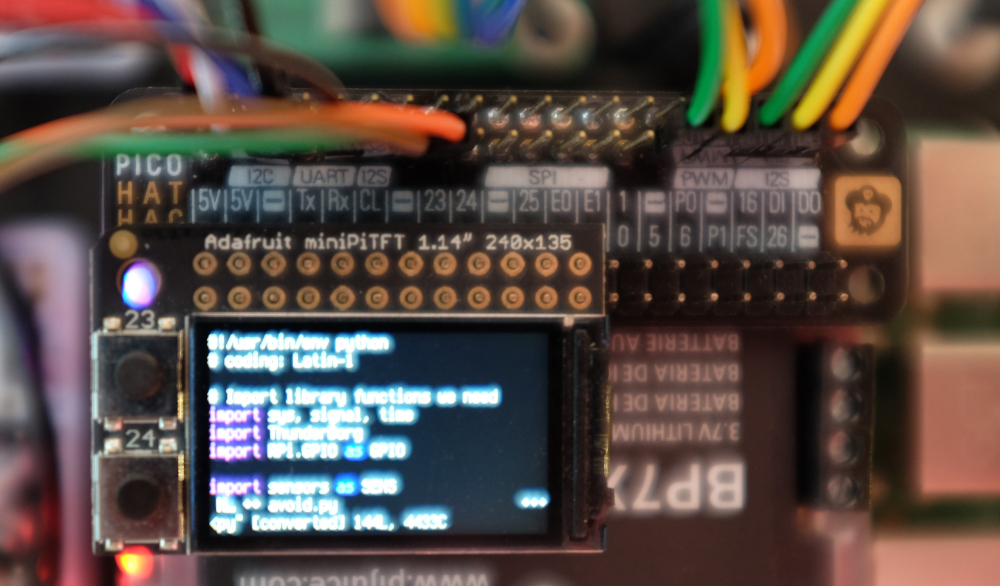
The aft board is a Adafruit Perma Proto Bonnet, a PC board designed to fit on top of a Raspberry Pi Zero, here repurposed to provide dual header pins to provide connections to the upper board (see KR 01 Wiring Notes).
Minimal Option#
The KR01 has a lot of features, a lot of experimental features, and therefore costs. The current expenditures, which includes sensors, components and hardware that may possibly not even get used (hey! it's an experiment), is well over NZ$1000. But a lot of those experiments proved essential for the robot's operation, and many of them aren't even currently mounted on the robot. Some were ideas that didn't pan out, or ideas that might be re-mounted on the robot sometime in the future.
If you wanted to get started on a lower budget you could begin with the basic OSEPP Tank Kit, some kind of robot controller (an Arduino, Raspberry Pi, whatever), a motor controller (RobotShop has some dual motor controllers starting under US$5, with many on the market), and power the robot using a commonly-available USB battery. With a mechanical bumper made from lever switches it'd be possible to build this for under NZ$200.
Here's a start for around NZ$170:
- OSEPP Tank Kit : US$100 (RobotShop)
- Raspberry Pi Zero W : US$10, AdaFruit
- Maker Drive H-Bridge Motor Driver for Beginner : US$3.73 (RobotShop)
...you'd still need to add a battery, some sensors and miscellaneous parts. And of course, don't forget to include shipping costs in your budget!
Pages Tagged "KR01"#
Links#
- KR01 Wiring Notes
- The KR01 Robot Project NZPRG blog entry